

LEARN HOW TO KNIT
We need your help.
Scroll Down
LEARN HOW TO KNIT AND JOIN US IN KNITTING OUR LOVE TO TINY BEGINNINGS
Making a knit hat is fun and easy to do. It’s a perfect way to be a part of this meaningful cause. Organize a knitting party with friends or colleagues, or knit one in your spare time. It only takes about one hour for beginners and can be cut down to 35 minutes once you get the hang of it. Children, parents, grandparents can all do it and have fun! We have created an easy guide for you below and a video to teach you how to knit a beanie for a premature baby!
Supplies


*A link to the small loom used by many Madhatter Knits members can be reached by clicking "Small Circle Loom" under the icon of the loom above. Included in the kit is the loom hook and yarn needle that you will need.
Let's Get Started
3 MAin stages

24-peg loom (15 1/2 in or 14 cm diameter)

1 loom hook

yarn (1 skein chunky yarn OR 2 skein regular yarn)
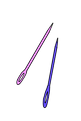
1 yarn needle
scissors
Let's Get Started
3 main stages
Knitting the Brim
STEP
01
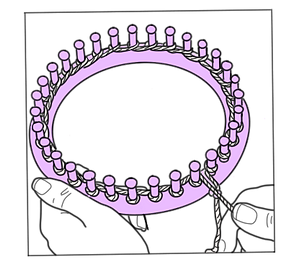
STARTING OFF
Wrap the end of your yarn(s) around the outer peg on the edge of the loom as indicated in the picture on the right. Pull the long end of the yarn(s) up between the first and last pegs.

FIRST
LAST
STEP
02
WRAP
Keeping the yarn relatively loose, wrap the yarn completely around the first peg and cross it in the back per the arrows of the close up of the illustration. Continue wrapping the pegs until you reach the last peg.

STEP
03
SLIDE DOWN
Slide the yarn loops on each of the pegs toward the bottom of the pegs.
LAST
FIRST
STEP
04
WRAP AGAIN!
With the previous row near the bottom of the pegs, wrap the yarn around all the pegs a second time in the same manner as Step 2. Again, start with the first peg and end with the last peg.
FIRST

LAST
STEP
05
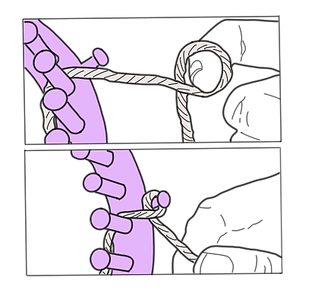
UNRAVEL PREVENTION
To prevent the yarn from unraveling, secure the loose end of your yarn around the outer peg. You may do so by making a half hitch, as follows: (a) create a loop in the yarn
(b) place the loop on the outer peg an pull the end to tighten
a
b
STEP
06
HOOK OVER
Using the loom hook, lift the bottom row of yarn hoops over the top row and over the pegs. Once you are finished with the last row, you will have one row of loops on your pegs. You have completed your first row of knitting!


STEP
07
MAKING THE BODY OF THE BRIM
Push the row of loops to the bottom of the pegs again. Undo the half hitch that you made in Step 5, and repeat Steps 4 through 7 another ~7 more times to have a total of approximately 8 rows or until you have approximately 3" of knitted material. Your finished knitting will emerge from inside the loom. After knitting several rows, you may unwrap the original loop you made in Step 1 (on the outer peg) and let the yarn hang.

STEP
08
FORMING THE BRIM
Make sure you have only one row of loops on all of your pegs. Reach inside the loom and pull the loops from your first row of knitting over the corresponding pegs, as follows:
Pull up the long, loose yarn at the beginning of your knitting and place it between the first and last pegs. (This will help you align the loops with the pegs.) The "loop" is actually the long bar of yarn that runs between two stitches (shown left). Starting with the peg to the right of your original loose yarn, pull the loops up until all of the pegs are covered. Now, you should have two rows of yarn loops on your pegs, the last row you had knitted now pushed to the bottom and the top row which consists of the first row you had knitted in Step 6.
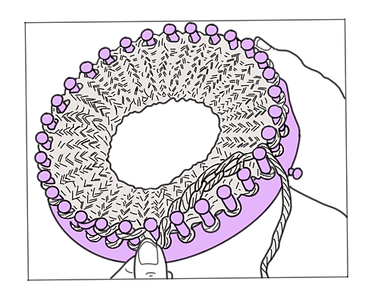
LOOP
STEP
09

FINISH OFF YOUR BRIM
Using the loom hook, pull the bottom row of loops over the top row and the pegs just as you did in Step 6.
STEP
03
REACH THE RIGHT AUDIENCE:
Bring the yarn behind the first vertical peg and then around the front. Continue this all the way around the loom - start on one side of the peg and end on the other side (you can go left or right)
NOTE: try not to wrap too tight
STEP
04
Forming the Body of the Beanie
STEP
10
ONWARDS!
Continue wrapping the yarn around the pegs and pulling the bottom row over the top and the pegs, just as you were prior to finishing off the brim. Stop after 12-15 rows or when the length of the knitted part after the brim is approximately 4-5"

STEP
05
STEP
06
Finishing the Top of Your Beanie
STEP
11
CUT LOOSE
You are almost there! You have done most of the work by now and just need to finish it off. To do so, instead of looping your yarn to form a second row as you have been doing, measure approximately 5" (or half the circumference of your loom) of the yarn that is still a part of the skein and make a cut. Now you should have something that looks similar to the illustration on the left.

STEP
12
THREAD THE NEEDLE
Thread the now loose yarn(s) through the yarn needle.

STEP
13
FREE FROM THE LOOM
If you have shifted the last row that you had knitted to the bottom, shift the row back to towards the top of the peg for ease for the following step. Starting with the first peg, use the needle to sew through the yarn loop on each peg. For each loop, thread through the loop on the peg, then pull the loop up and over the peg, freeing it from the peg. Continue this until you have sewn through all the loops and pulled them all off of their respective pegs. Your hat should now be free of the loom.

STEP
14
CINCH
Pull the yarn while cinching the top of the beanie. Keep pulling the yarn/cinching the top until the yarn can no longer be pulled. It should be fairly tight. Then, using the yarn needle still threaded through the yarn(s) sew an asterisk pattern to the top before pushing the needle through to the inside of the hat.

STEP
15
FINAL KNOT
Turn your beanie inside out. Double knot the yarn that you had just pushed through. Make sure to make the knots tight and as close to the top as possible. Cut the ends of the loose yarn, leaving ½" - 1" tails. There will also be a yarn end hanging near the brim of your beanie. This is original yarn from when you first started your hat. Weave the end of this yarn into the middle of the brim with the yarn needle.

VOILÀ

You're done!